Azure IoT HubのSASトークンについて
Azure IoT SDKsを使わずに、Azure IoT HubにMQTT, AMQP, HTTPSなどで接続するにはSASトークンという文字列を渡さなければいけないのだが、このSASトークンが一体何者か良く分からない。
何度、ドキュメントを読み返しても分からない。
さまざまな用語が出てきます。共有アクセスポリシー、セキュリティ資格情報、資格情報、トークン、対称キー、SASトークン、IoTHubセキュリティトークン、セキュリティトークン、共有アクセスキーで署名されたトークン...
あー、わけわからない。
わからないままでは前に進めないので、ちょっと時間をかけて自分なりに整理してみました。
前提
- デバイスからIoT Hub、サービスからIoT Hubに接続するときの、SASトークンを調べました。他のAzureサービスのSASトークンが同様かは不明です。
- IoT Hubへのアクセスの制御の日本語と英語を何度も読み返して整理しました。また、Azureポータルの画面も確認しました。アプリを作って検証とかはしていないです。
デバイスからIoT Hub
IoT Hubレベルで定義されている共有アクセスポリシー、もしくは、デバイス毎のセキュリティ資格情報でアクセス制御します。
デバイス毎のセキュリティ資格情報は、対称キー、自己X509証明書、証明機関X509証明書の3つがあり、デバイスを作るときに指定します。(なお、デバイス毎のセキュリティ資格情報はIoT HubのIdentity Registryに格納されています。)
- 共有アクセスポリシー(IoT Hubレベル)
- セキュリティ資格情報(デバイス毎)
- 対称キー
- 自己X509証明書
- 証明機関X509証明書
このうち、共有アクセスポリシーと対称キーでアクセス制御するときに、SASトークンを生成して、MQTTなどで接続するときに渡します。
サービスからIoT Hub
共有アクセスポリシーでアクセス制御します。おしまいw
共有アクセスポリシーからSASトークンを生成
リソースURIと共有アクセスポリシー名、共有アクセスキー、有効期限から、base64とかHMAC-SHA256計算とかして作り出します。
- リソースURI ... 接続するIoT HubのリソースURI。"myhub.azure-devices.net/devices/device1"
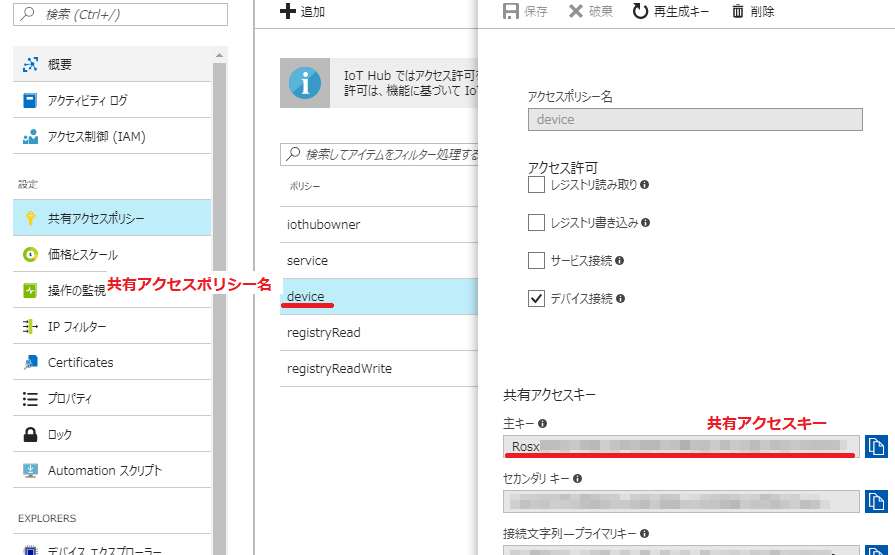
- 共有アクセスポリシー名 ... "device"
- 共有アクセスキー ... "Rosx8/5Q7THau334G6WlwAR0lsZc3Yt1QdcWCmr7KYA="
- 有効期限 ...
適当に適切に決める
共有アクセスポリシー名、共有アクセスキーは、Azureポータルの下図の箇所の値です。
計算の具体的なコードはドキュメントをgenerateSasTokenで検索して探してください。

対称キーからSASトークンを生成
リソースURIと対称キー、有効期限から、base64とかHMAC-SHA256計算とかして作り出します。
- リソースURI ... 接続するIoT HubのリソースURI。"myhub.azure-devices.net/devices/device1"
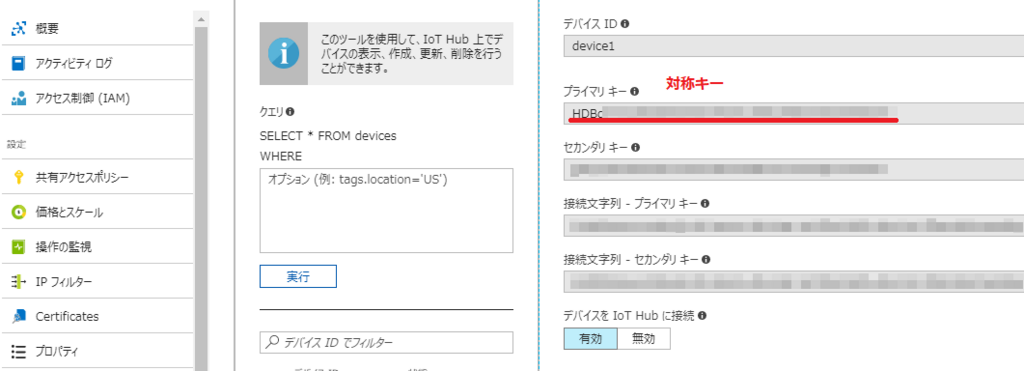
- 対称キー ... "HDBqV7U2dRosEh2Xxf//MYzA2T111rRkEmV2dJW0k0s="
- 有効期限 ...
適当に適切に決める
対称キーは、Azureポータルの下図の箇所の値です。
計算の具体的なコードはドキュメントをgenerateSasTokenで検索して探してください。

気になったこと
- ”トークンの期限が切れた時点で、IoT Hub はデバイスの接続を切断します。 ”という記述があります。なので、切断されたら自動的にSASトークンを再生成して、ネットワーク再接続するロジックが必要。
- 最後の方にちょろっと書いてある、”カスタムデバイスの認証”モデルが気になる。デバイスはトークンサービスにSASトークンを要求すると、何らかの手段でデバイスを認証してSASトークンを発行する仕組み。
- 共有アクセスポリシーや対称キー(から生成したSASトークン)はアクセスの制御。認証ではない!ところがポイント。
参考
TinyCLR OS 1.0 ロードマップ
GHI ElectronicsのJohnから、TinyCLR OS 1.0リリースまでのロードマップが発表されました。
簡単に日本語訳しますと、
v0.7.0(2018年1月)
- CANライブラリ追加
- Interops改善
- ライブラリの全ピン対応
v0.8.0(2018年2月)
- Cortex-M7向けコアライブラリ
- 低レベルWiFiドライバ(STマイクロエレクトロニクス)
- FEZ Hydraファームウェア
v0.9.0(2018年3月)
v1.0.0RC(2018年4月)
- ドキュメントの更新
- オンラインギャラリー
です。
v0.6.0が2017年8月だったので、急にスピードアップする感じですね。
気になる点としてはInterops改善とソケットとHTTPのライブラリ。
現在のInteropsは少し複雑なので、改善されるのは歓迎なのですが、ちょうど今から本格的に取り組もうかと考えていたので、どうしようかなと迷うところ。
通信関連のライブラリは、やっとという感じです。みんな待っていたのではないでしょうか。Low-level ST's WiFi driverっていったい何を示しているんだろう?STM+WiFiでググってみると、SPWF04が出てきた。これのことなんだろうか。
【メモ】Native Interops in TinyCLR その2
これの続きです。
Native stubを生成
前回最後にやった「Native stubを生成」で、
class MyNativeClass
{
    [MethodImpl(MethodImplOptions.InternalCall)]
    public extern int MyNativeFunc(int param1, int param2);
}
から生成されたファイルは3つでした。
- TinyCLRApplication1.h
- TinyCLRApplication1.cpp
- TinyCLRApplication1_TinyCLRApplication1_MyNativeClass.cpp
そのうち、実コードを記入するのはTinyCLRApplication1_TinyCLRApplication1_MyNativeClass.cppにある、
TinyCLR_Result Interop_TinyCLRApplication1_TinyCLRApplication1_MyNativeClass::MyNativeFunc___I4__I4__I4(const TinyCLR_Interop_MethodData md)
です。
TinyCLR_ResultはTinyCLR.hに定義されていて、enum型。まぁ、これは分かりやすい。
TinyCLR_Interop_MethodDataはApiProviderとStackが含まれた構造体で、ApiProviderはAcquire,Release,Add,Removeなどのvtableっぽい。StackはApiProviderにあるAPIに渡す引数で使うのかな。
これらメンバーの使い方はココにありますが、ほとんど書かれておらず参考になりませんねw
ApiProviderのメンバーをじっくり見ると、下記のとおり分類できるようだ。
ApiProvider 引数と戻り値
GetArgument(const TinyCLR_Interop_Provider* self, const TinyCLR_Interop_StackFrame& stack, size_t index, TinyCLR_Interop_ManagedValue& value)
GetReturn(const TinyCLR_Interop_Provider* self, TinyCLR_Interop_StackFrame& stack, TinyCLR_Interop_ManagedValue& value)
ApiProvider 参照カウンタ操作?
Acquire(const TinyCLR_Interop_Provider* self)
Release(const TinyCLR_Interop_Provider* self)
ApiProvider Interop追加/削除
Add(const TinyCLR_Interop_Provider* self, const TinyCLR_Interop_Assembly* interop)
Remove(const TinyCLR_Interop_Provider* self, const TinyCLR_Interop_Assembly* interop)
ApiProvider 型情報の検索
FindType(const TinyCLR_Interop_Provider* self, const char* assemblyName, const char* namespaceName, const char* typeName, TinyCLR_Interop_ManagedObjectType& type)
ApiProvider マネージオブジェクトの生成/入れ替え?/自オブジェクトの取得
CreateObject(const TinyCLR_Interop_Provider* self, TinyCLR_Interop_StackFrame& stack, TinyCLR_Interop_ManagedValue& value)
ReplaceObject(const TinyCLR_Interop_Provider* self, TinyCLR_Interop_ManagedValue& source, TinyCLR_Interop_ManagedValue& destination)
GetThisObject(const TinyCLR_Interop_Provider* self, TinyCLR_Interop_StackFrame& stack, TinyCLR_Interop_ManagedValue& value)
ApiProvider フィールドとイベント
GetField(const TinyCLR_Interop_Provider* self, TinyCLR_Interop_ManagedValue managedObject, size_t index, TinyCLR_Interop_ManagedValue& value)
GetStaticField(const TinyCLR_Interop_Provider* self, const TinyCLR_Interop_Assembly& interop, size_t index, TinyCLR_Interop_ManagedValue& value)
RaiseEvent(const TinyCLR_Interop_Provider* self, const char* eventDispatcherName, const char* apiName, size_t implementationIndex, uint64_t data0, uint64_t data1, intptr_t data2)
Interopコードを実装
細かいところは置いておいて、サンプルコードを参考に、呼び出された回数を返すようTinyCLRApplication1_TinyCLRApplication1_MyNativeClass.cppを実装してみました。
#include "TinyCLRApplication1.h"

TinyCLR_Result Interop_TinyCLRApplication1_TinyCLRApplication1_MyNativeClass::MyNativeFunc___I4__I4__I4(const TinyCLR_Interop_MethodData md)
{
    static int counter = 0;

    TinyCLR_Interop_ManagedValue ret;
    ret.Type = TinyCLR_Interop_ManagedValueType::I4;
    ret.Data.Numeric->I4 = counter++;

    return TinyCLR_Result::Success;
}
Interopのビルド
makefileの作成
サンプルのmakefileをコピペして、OUTPUT_NAMEをMyInterop、INC_DIRSにTinyCLR.hがあるフォルダを追加しました。
OUTPUT_NAME = MyInterop
LINKERSCRIPT_NAME = scatterfile

MCU_FLAGS = -mcpu=cortex-m4 -mthumb
INC_DIRS = -I. -IC:\TinyCLR\TinyCLR-Ports\Core

CC = arm-none-eabi-g++.exe
LD = arm-none-eabi-g++.exe
OC = arm-none-eabi-objcopy.exe

CC_FLAGS = $(INC_DIRS) $(MCU_FLAGS) -Os -std=c++11 -xc++ -Wall -Wabi -w -mabi=aapcs -fPIC -fno-exceptions -fno-rtti -fno-use-cxa-atexit -fno-threadsafe-statics
LD_FLAGS = $(MCU_FLAGS) -nostartfiles -lc -lgcc -T $(LINKERSCRIPT_NAME) -Wl,-Map,$(OUTPUT_NAME).map -Wl,--oformat -Wl,elf32-littlearm
OC_FLAGS = -S -O binary

SRC_FILES = $(wildcard *.cpp)
OBJ_FILES = $(patsubst %.cpp, %.obj, $(SRC_FILES))

rebuild: clean build

clean:
    del $(OBJ_FILES) $(OUTPUT_NAME).bin $(OUTPUT_NAME).elf $(OUTPUT_NAME).map

build: $(OBJ_FILES)
    $(LD) $(LD_FLAGS) -o $(OUTPUT_NAME).elf $^
    $(OC) $(OC_FLAGS) $(OUTPUT_NAME).elf $(OUTPUT_NAME).bin

%.obj: %.cpp
    $(CC) -c $(CC_FLAGS) -o $@ $^
scatterfileの作成
サンプルのscatterfileをコピペして、RLI_BASEとRLI_LENGTHを、デバイスのScatterfile.gcc.ldfに書かれている(ER_RLP_BEGIN値)と(ER_RLP_END値-ER_RLP_BEGIN値)に書き換えます。
MEMORY {
    SDRAM (wx) : ORIGIN = 0x2001BC00, LENGTH = (0x2001C000 - 0x08) - 0x2001BC00
}

SECTIONS {
    . = ALIGN(4);

    .text : {
        *(.text)
    }

    .rodata ALIGN(4): {
        *(.rodata )
    }

    .data ALIGN(4): {
        *(.data)
    }

    .bss ALIGN(4): {
        *(.bss)
    }
}
make build
準備できた状態がこちら。

make buildコマンドを実行して、ビルド(コンパイル&リンク)してみます。


おおお!なんかできてるっぽい。

(つづく)
【メモ】Native Interops in TinyCLR
TinyCLR OSのInteropをウォークスルーしてみます。
TinyCLR Applicationを新規作成
Visual Studio 2017を起動して、TinyCLR Applicatonプロジェクトを新規作成します。

資料のサンプルコードはフィールド、メソッド、プロパティを宣言していますが、メソッドさえ動けばとりあえずは良いので、メソッドだけ宣言しました。
using System.Diagnostics;
using System.Runtime.CompilerServices;

namespace TinyCLRApplication1
{
    class Program
    {
        static void Main()
        {
            var instance = new MyNativeClass();
            Debug.WriteLine(instance.MyNativeFunc(10, 20).ToString());
        }
    }

    class MyNativeClass
    {
        [MethodImpl(MethodImplOptions.InternalCall)]
        public extern int MyNativeFunc(int param1, int param2);
    }
}
Native stubを生成
プロジェクトのプロパティにある、 * Generate native stubs for internal methods * Generate bare native stubs をチェックして、リビルドします。

リビルドした後は、元に戻しておきます。(両方ともチェックを外す)
リビルドした結果、bin/Debug/pe/Interop配下に、 * TinyCLRApplication1.h * TinyCLRApplication1.cpp * TinyCLRApplication1_TinyCLRApplication1_MyNativeClass.cpp が生成されます。

中身は次のとおり。
TinyCLRApplication1.h
#pragma once

#include <TinyCLR.h>

struct Interop_TinyCLRApplication1_TinyCLRApplication1_MyNativeClass {
    static TinyCLR_Result MyNativeFunc___I4__I4__I4(const TinyCLR_Interop_MethodData md);
};

extern const TinyCLR_Interop_Assembly Interop_TinyCLRApplication1;
TinyCLRApplication1.cpp
#include "TinyCLRApplication1.h"

static const TinyCLR_Interop_MethodHandler methods[] = {
    Interop_TinyCLRApplication1_TinyCLRApplication1_MyNativeClass::MyNativeFunc___I4__I4__I4,
    nullptr,
    nullptr,
    nullptr,
};

const TinyCLR_Interop_Assembly Interop_TinyCLRApplication1 = {
    "TinyCLRApplication1",
    0xAA047403,
    methods
};
TinyCLRApplication1_TinyCLRApplication1_MyNativeClass.cpp
#include "TinyCLRApplication1.h"

TinyCLR_Result Interop_TinyCLRApplication1_TinyCLRApplication1_MyNativeClass::MyNativeFunc___I4__I4__I4(const TinyCLR_Interop_MethodData md) {


    return TinyCLR_Result::NotImplemented;
}
Interop_TinyCLRApplication1 -> methods -> Interop_TinyCLRApplication1_TinyCLRApplication1_MyNativeClass::MyNativeFuncI4I4I4 と参照しているので、メソッドの実装はTinyCLRApplication1_TinyCLRApplication1_MyNativeClass.cppのInterop_TinyCLRApplication1_TinyCLRApplication1_MyNativeClass::MyNativeFuncI4I4I4 に書けば良いようです。
methods の配列が4なのが気になります。なにか意味があるのだろうか?
さらに、メソッドの引数の型、TinyCLR_Interop_MethodData も謎。
(つづく)
Visual Studio Codeでmbed OSプログラムをデバッグする方法(STM32)
以前、Visual Studio Codeでmbed OSをデバッグする方法を試していました。
OCDにpyOCDとOpenOCDの2種類ありますが、OpenOCDの方(対象がSTM32のときに使う)はGDBサーバーの自動起動がうまくできなくて、その後、Visual Studio Code(というかC/C++拡張機能)のIntelliSense微妙だよね?となり、C/C++拡張機能のソースコードが公開されていないなー、使うならVisual Studioだよなー、と脳内が大幅に脱線してしまって、全然、Visual Studio Codeを触っていませんでした。
ですが、先日、ET2017のArmブースで渡會さんがVisual Studio CodeでSTM32をデバッグするデモを展示しており、すぐにセットアップ手順も公開されたので、それに沿って「以前、なにがダメだったのか」を確認しようと思います。
渡會さんが公開しているセットアップ手順はこちら。 VSCodeでSTM32マイコンのデバッグ環境を構築する | Mbed
必要なソフトウェアのインストール
VSCodeのダウンロードとインストール
既にVSCodeはインストールされていました。しかし、x86だったので、x64 1.18.1をインストールしました。
C/C++拡張機能のインストール
C/C++ 0.14.2をインストールしました。
OpenOCDのインストール
既にインストールされていました。
Open On-Chip Debugger 0.10.0+dev-00130-gcb317ea-dirty (2017-04-26-21:33)
Mbed OS用ビルドツールのインストール
Mbed CLIの開発環境が整っているので、たぶん大丈夫でしょう。というわけでスルー。
プロジェクトの設定
適当なフォルダに、サンプルプログラムをインポートします。これはいつもやっている操作ですね。
C:\mbed>mbed import mbed-os-example-blinky
VSCode用にプロジェクトをエクスポートですが、たぶんここは用意したボードに合わせて、コマンドの引数を変更しないといけない気がします。
mbed detectで、ボードの名前を確認します。
C:\mbed\mbed-os-example-blinky>mbed detect

[mbed] Detected NUCLEO_F401RE, port COM11, mounted D:, interface version 0221:
[mbed] Supported toolchains for NUCLEO_F401RE
+---------------+-----------+-----------+-----------+-----------+-----------+-----------+
| Target        | mbed OS 2 | mbed OS 5 |    ARM    |  GCC_ARM  |    IAR    |   ARMC6   |
+---------------+-----------+-----------+-----------+-----------+-----------+-----------+
| NUCLEO_F401RE | Supported | Supported | Supported | Supported | Supported | Supported |
+---------------+-----------+-----------+-----------+-----------+-----------+-----------+
Supported targets: 1
Supported toolchains: 4
NUCLEO_F401REであることが分かったので、それっぽくエクスポートを実行してみます。
C:\mbed\mbed-os-example-blinky>mbed export -m NUCLEO_F401RE -i vscode_gcc_arm
Scan: .
んー、なんか味気ないメッセージ表示で、ちゃんと実行できたか分かりませんが、このまま進めてみましょう。
.vscode/launch.jsonを、下記のとおり4箇所変更します。ボードとインターフェースに何を指定したらいいのか分からなかったので適当に変更しました。
            "debugServerArgs": "-f \"C:\\OpenOCD\\tcl\\board\\stm32f4discovery.cfg\" -f \"C:\\OpenOCD\\tcl\\interface\\stlink-v2-1.cfg\" -c init -c \"reset init\"",
            "serverStarted": "target halted due to debug-request, current mode: Thread",
                "MIDebuggerPath": "C:\\Program Files (x86)\\GNU Tools ARM Embedded\\4.9 2015q3\\bin\\arm-none-eabi-gdb.exe",
                "debugServerPath": "C:\\OpenOCD\\openocd.exe",
ビルドとデバッグ
Visual Studio Codeの"フォルダを開く"で、mbedソースが置いてあるフォルダを開いて、デバッグ>デバッグの開始を実行します。

あれれ、良く分からないエラーが。
めげずに何度もデバッグ>デバッグの開始、をすると、なんとなくOpenOCDの起動のところまで進みました。

OpenOCDの起動でエラーになっている模様。
コマンドプロンプトで実行してみると、cfgファイルの選択が間違っているように見受けられます。
C:\mbed\mbed-os-example-blinky>"C:\OpenOCD\openocd.exe" -f "C:\OpenOCD\tcl\board\stm32f4discovery.cfg" -f "C:\OpenOCD\tcl\interface\stlink-v2-1.cfg"
Open On-Chip Debugger 0.10.0+dev-00130-gcb317ea-dirty (2017-04-26-21:33)
Licensed under GNU GPL v2
For bug reports, read
        http://openocd.org/doc/doxygen/bugs.html
C:\OpenOCD\tcl\board\stm32f4discovery.cfg:4: Error: Can't find interface/stlink-v2.cfg
in procedure 'script'
at file "embedded:startup.tcl", line 60
at file "C:\OpenOCD\tcl\board\stm32f4discovery.cfg", line 4
NUCLEO_F401RE -> NUCLEO_L476RG
NUCLEO-F401REを早々に諦めて、過去実績のあるNUCLEO-L476RGで試すことに。
mbed export -m NUCLEO_L476RG -i vscode_gcc_armして、.vscode/launch.jsonを下記のとおり編集します。
            "debugServerArgs": "-s C:\\OpenOCD\\tcl -f board\\st_nucleo_l476rg.cfg -c init -c \"reset init\"",
            "serverStarted": "target halted due to debug-request, current mode: Thread",
                "MIDebuggerPath": "C:\\Program Files (x86)\\GNU Tools ARM Embedded\\4.9 2015q3\\bin\\arm-none-eabi-gdb.exe",
                "debugServerPath": "C:\\OpenOCD\\openocd.exe",
デバッグの開始で何度かエラーになりましたが、繰り返すことで、無事、デバッガが起動しました!!!

感想
- mbed OS(STM32)をVisual Studio Codeでデバッグできた。OpenOCDで。
- デバッグの開始で、エラーになるときがあった。(ビルドに時間がかかるとエラーになるのか!?)
- 以前はserverStartedを設定していなかったのがダメだった気がする。
- 使うボードによってOpenOCDの設定をどうしたらいいか分からなかった。
- IntelliSense、まともに使える。(以前やったときは、イマイチと感じていたが、mbed-cliでimportしたのが良かったのかも?)
SignalR (alpha) for ASP.NET Core 2.0
LinuxでSignalRを使いたいと思いググったところ、ちょうどalphaバージョンがリリースされた直後でした。
このBlogのGetting Startedにやり方が書いてあるものの、ちょっとよく分からなかったので、SignalR .NET Core: Realtime cross-platform open web communicationを参考に手順を書いておきます。
SignalRって何?という方は、こちらをご参照ください。
SignalRサーバー
Visual Studio 2017で、ASP.NET Core Web アプリケーションのプロジェクトを新規作成します。

ASP.NET Core 2.0を選んで、空を選択。

出来上がったプロジェクトはこちら。

nugetからMicrosoft.AspNetCore.SignalRをインストールします。このとき、似たような名前があるので注意して選んでください。なお、現在はalphaバージョンなので、プレリリースを含めるをチェックしないと表示されません。

追加されました。

サービスにSignalRを追加します。StartupクラスのConfigureServices()にservices.AddSignalR()を追加してください。そして、Configure()にChatクラスへのルーティングを追加しておきます。
Startup.cs
        public void ConfigureServices(IServiceCollection services)
        {
            services.AddSignalR();
        }

        public void Configure(IApplicationBuilder app, IHostingEnvironment env)
        {
            if (env.IsDevelopment())
            {
                app.UseDeveloperExceptionPage();
            }

            app.UseSignalR(routes =>
            {
                routes.MapHub<Chat>("chat");
            });

            //app.Run(async (context) =>
            //{
            //    await context.Response.WriteAsync("Hello World!");
            //});
        }
Chatのところのクイックアクションで、Chatクラスを追加します。

Chatクラスを下記のとおり記入します。
Chat.cs
using Microsoft.AspNetCore.SignalR;
using System.Threading.Tasks;

namespace SignalRCore2
{
    public class Chat : Hub
    {
        public Task Send(string data)
        {
            return Clients.All.InvokeAsync("AddMessage", data);
        }
    }
}
実行して、http://localhost:50031/chatを開いたときにConnection ID requiredと表示されれば正常です。

SignalRクライアント
クライアントからjsファイルやhtmlファイルを開けるよう、StartupクラスのConfigure()にapp.UseFileServer()を追加します。
Startup.cs
    public class Startup
    {
        public void Configure(IApplicationBuilder app, IHostingEnvironment env)
        {
            ...
            app.UseFileServer();
        }
npmコマンドでネットからsignalr-client-1.0.0-alpha1-final.min.jsを取得して、wwwroot/scriptsにコピーします。
npm install @aspnet/signalr-client

mkdir C:\Users\takashi\Desktop\SignalRCore2\wwwroot\scripts
copy node_modules\@aspnet\signalr-client\dist\browser\signalr-client-1.0.0-alpha1-final.min.js C:\Users\takashi\Desktop\SignalRCore2\wwwroot\scripts
wwwrootにindex.htmlを新規作成します。

index.htmlのbodyタグに追加します。
index.html
<!DOCTYPE html>
<html>
<head>
    <meta charset="utf-8" />
    <title></title>
</head>
<body>
    <input type="text" id="message" />
    <input type="button" id="send" value="send" />

    <ul id="messages"></ul>

    <script src="/scripts/signalr-client-1.0.0-alpha1-final.min.js"></script>
    <script>
       var conn = new signalR.HubConnection('http://localhost:50031/chat');

       conn.on('AddMessage', data => {
           var li = document.createElement('li');
           li.innerText = data;
           document.getElementById('messages').appendChild(li);
       });

       conn.start()
           .then(() => {
               console.log('Started');
           })
           .catch(err => {
               console.log('Err');
           });

       document.getElementById('send').addEventListener('click', evt => {
           var data = document.getElementById('message').value;
           conn.invoke('Send', data);
       });
    </script>
</body>
</html>
結果
実行すると、このとおり!

サンプルコード
.NET Core on BeagleBone Green(Debian 9.1)
BeagleBone Greenで.NET Coreを動かしてみました。
動機
BeagleBone GreenでAzure IoT Edgeが動くか試していて、Cサンプルが動くところまでは出来ました。 でも、Cだと開発がツライ。できればC#使いたい。ので、.NET Coreをインストールしたのですが、packageが無いとエラーに。
debian@beaglebone:~/iot-edge/build$ sudo apt-get install dotnet-sdk-2.0.0
E: Unable to locate package dotnet-sdk-2.0.0
そもそも、BeagleBone Greenで.NET Coreって動くのか? ということで、調べることにしました。
.NET Core for Linuxはx64だけ
.NET Core 2.0 - Supported OS versionsによると、対応アーキテクチャはx64だけで、ARMは対応外orz
.NET Core 2.0 RuntimeだけならARM32あり
でも、こんな素敵なブログが!
Setting up Raspian and .NET Core 2.0 on a Raspberry Pi
これによると、.NET Coreアプリケーションの開発や実行は、
の3つのコンポーネントに分かれていて、.NET Core RuntimeはARM32でも動くと書いてあります。
RuntimeのDaily Buildsがここにあって、ARM32に相当するLinux(armhf)が存在することが確認できます。
やってみる
BeagleBone Greenのファームウェアを最新にアップデートして、先のブログの手順を実施してみます。
なお、使ったファームウェアはbone-debian-9.1-iot-armhf-2017-08-31-4gb.img。
BeagleBone Greenに.NET Core Runtimeをインストール
Setting up Raspian and .NET Core 2.0 on a Raspberry PiのTask: Install the .NET Core Runtime on the Raspberry Pi.を実行します。
debian@beaglebone:~$ curl -sSL -o dotnet.tar.gz https://dotnetcli.blob.core.windows.net/dotnet/Runtime/release/2.0.0/dotnet-runtime-latest-linux-arm.tarr.gz
debian@beaglebone:~$ sudo mkdir -p /opt/dotnet && sudo tar zxf dotnet.tar.gz -C /opt/dotnet
debian@beaglebone:~$ sudo ln -s /opt/dotnet/dotnet /usr/local/bin
何事もなく終了。
.NET Coreアプリケーションを用意
.NET Coreアプリケーションは、Windows PCのVisual Studioで開発します。
プロジェクトの新規作成で、コンソールアプリ(.NET Core)を選択し、コンソールに適当に表示するコードを用意します。
using System;

namespace ConsoleApp1
{
    class Program
    {
        static void Main(string[] args)
        {
            Console.WriteLine("Hello BBG!");
            Console.ReadLine();
        }
    }
}
.NET Coreアプリケーションをlinux-arm用に作成して、BeagleBone Greenへコピー
BeagleBone Greenへ持っていく実行ファイル群をWindows PCでdotnet publishコマンドで作成してから、ファイル転送しなければいけません。
具体的には、.csprojのフォルダで、dotnet publish -r linux-armを実行します。
C:\Users\takashi\Desktop\netcore\ConsoleApp1>dotnet publish -r linux-arm
すると、プロジェクト配下のbin\Debug\netcoreapp2.0\linux-armフォルダとbin\Debug\netcoreapp2.0\linux-arm\publishフォルダにそれらしいファイルが出来上がるので、publishフォルダの中身すべてをBeagleBone Greenへコピーします。わたしは、zip圧縮してからTeraTermのSSH SCPでコピーしました。

BeagleBone Greenで.NET Coreアプリケーションを実行
コピーした.NET Coreアプリケーションに実行属性が付いていないので、実行属性を付けてから実行します。
debian@beaglebone:~/netcore$ chmod a+x ConsoleApp1
debian@beaglebone:~/netcore$ ./ConsoleApp1
Hello BBG!
動いた!!!
おまけ
- .NET Core Runtimeをインストールせずに.NET Coreアプリケーションを実行すると下記のエラーが発生する。
debian@beaglebone:~/netcore$ ./ConsoleApp1
Failed to load
, error: libunwind.so.8: cannot open shared object file: No such file or directory
Failed to bind to CoreCLR at '/home/debian/netcore/libcoreclr.so'
- .NET Core Runtimeをインストールするとディスクを約52Mbytes消費した。
- Debugging .NET Core on Linux #5を参考にリモートデバッグを試したがプロセス一覧から選択した先で接続がプッツリ切れてデバッグできない。(.NET Core Runtimeだけではダメなのかな)